8 Best Lighting Techniques for Stunning Newborn Photography
Master newborn photography with these 8 best lighting techniques! Learn how to pose and capture stunning newborn photos using natural light. Perfect for DIY newborn photos!
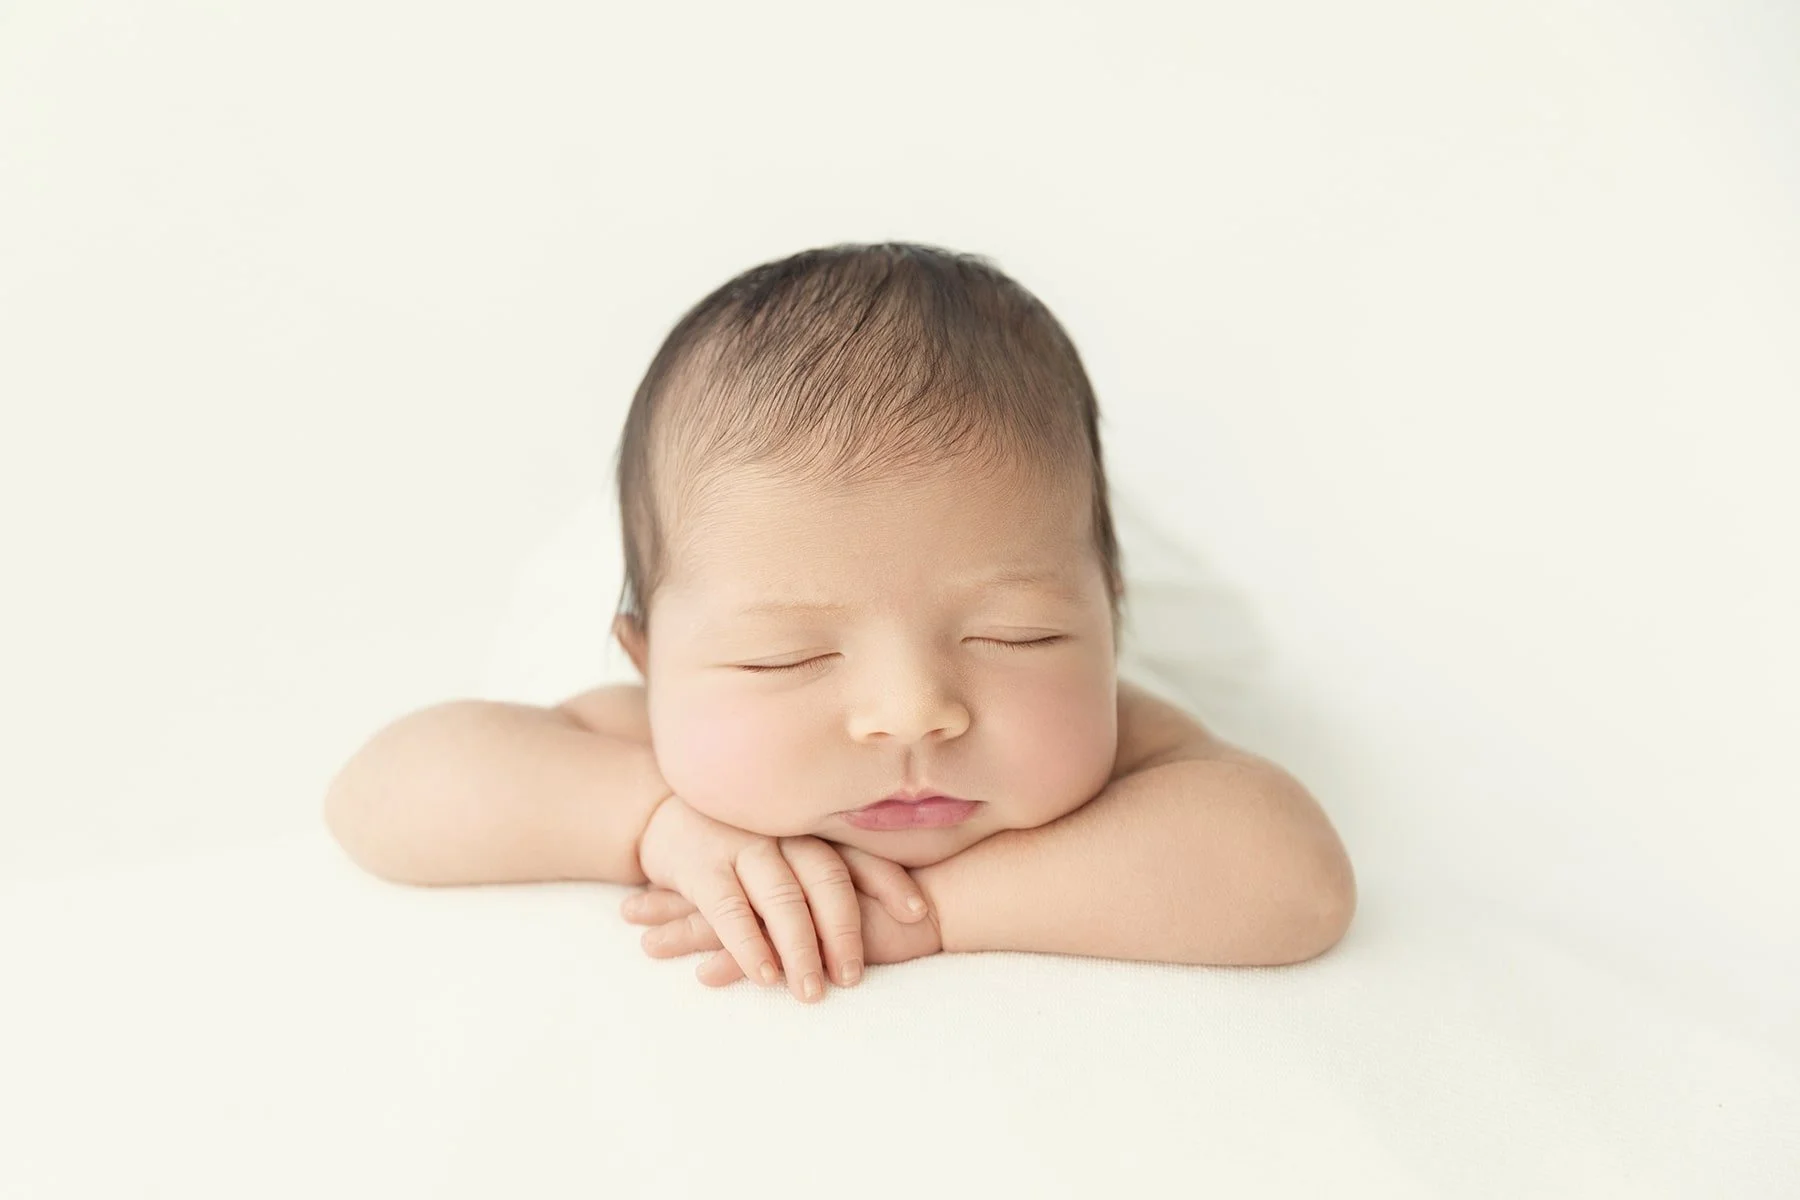
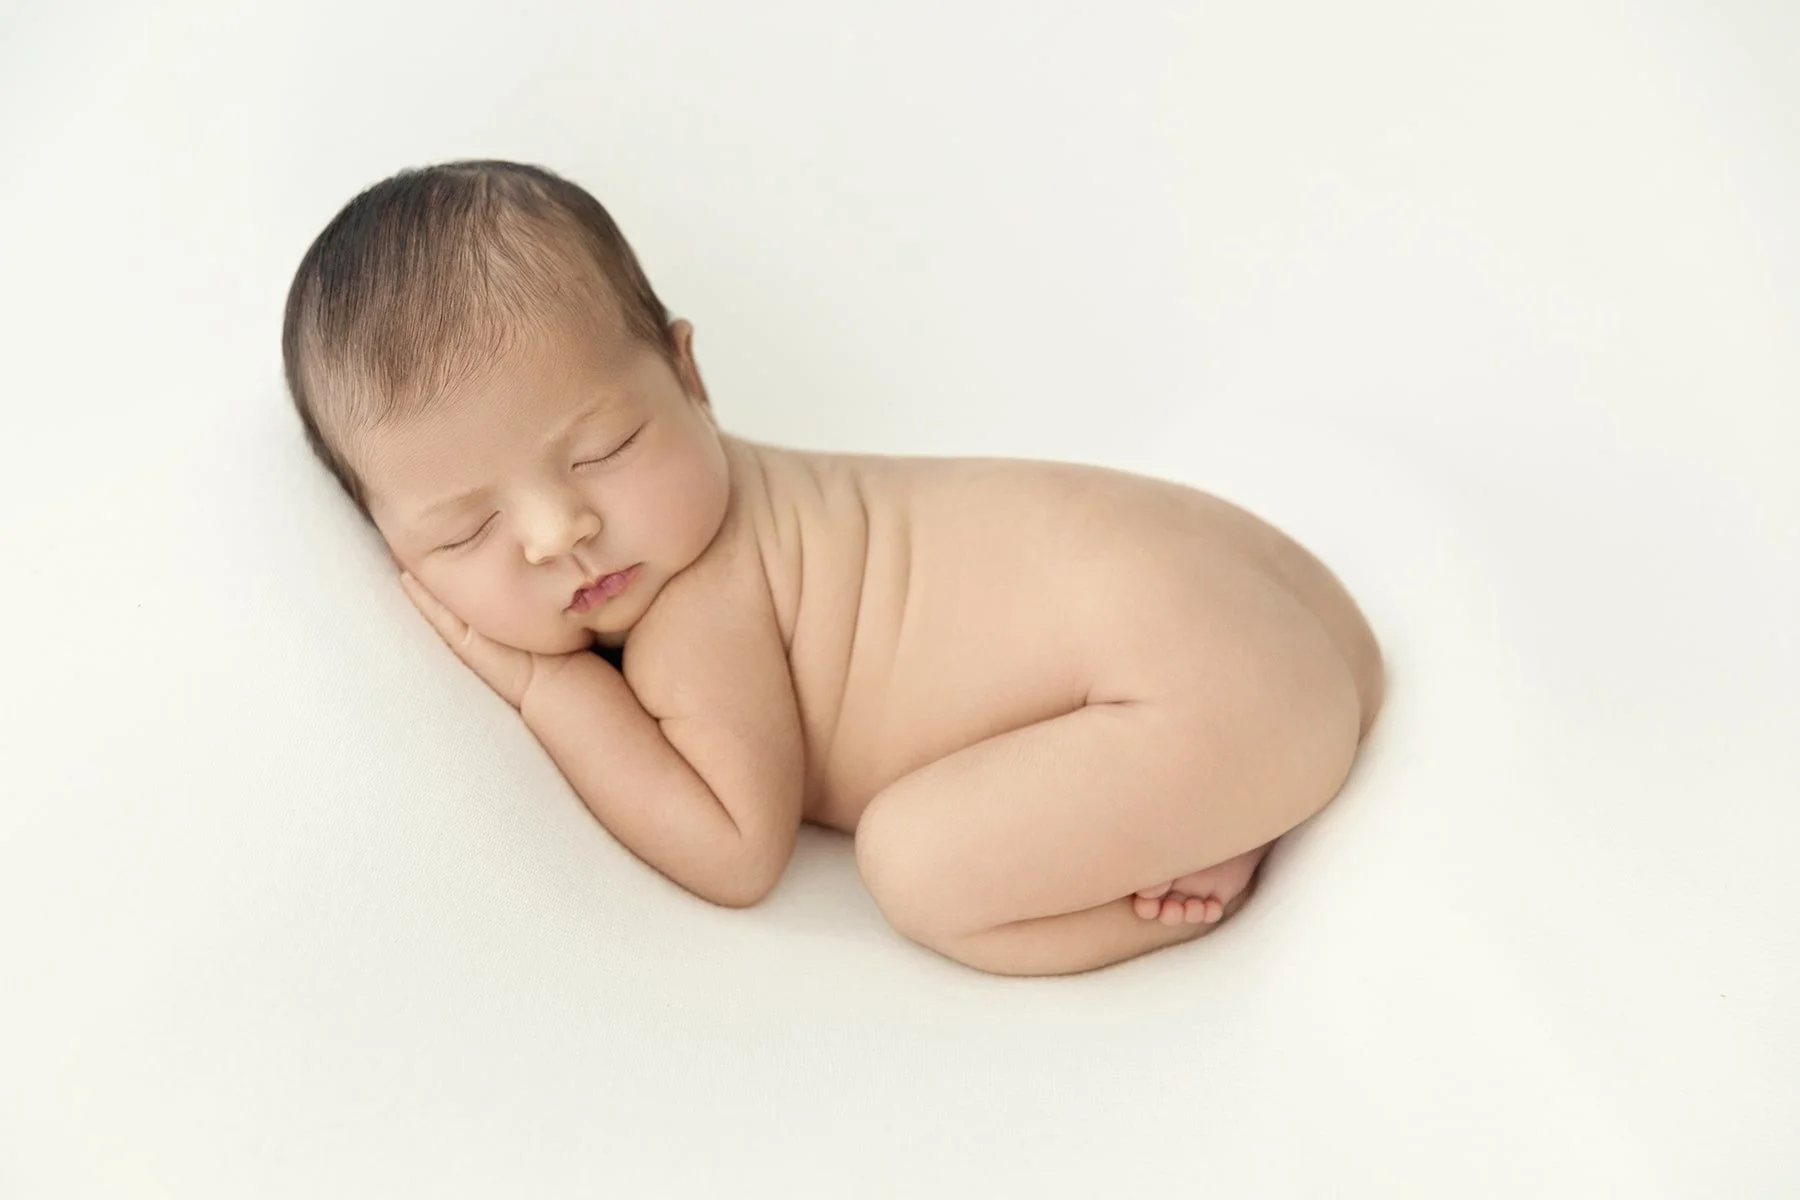
As a newborn photographer, lighting is the backbone of my work. It’s what creates the softness in the cheeks, the delicate shadow under the nose, the calm atmosphere in the studio, and the quiet depth that makes a portrait feel refined rather than flat. These techniques are the exact ones I use every day in my Beverly Hills studio. They are simple, repeatable, and built to keep the baby safe, comfortable, and settled while producing images that feel clean, natural, and timeless.
If you are a parent looking to take beautiful pictures go your baby or a photographer looking to improve your craft, see my Newborn Photography Course here.
Technique 1: Natural Light
When I work with natural light, the entire setup starts with the room. Before the camera comes out, I look at the direction and quality of the light coming through the window. For newborn photography, I want the light to be soft, broad, and close, so it wraps gently around the baby’s features and avoids hard shadows.
A large window is ideal, especially one with indirect light. North-facing light stays consistent throughout the day; east-facing is best earlier in the morning; west-facing is usually better late morning before it becomes too strong. I typically schedule newborn sessions around 10–11am because the light is stable and babies tend to be more settled at that time.
The posing surface is placed parallel to the window so the light falls across the baby from the side. Then I control the softness and strength of the light using sheer curtains or muslin to diffuse it. If the sun becomes direct or too bright, doubling the diffusion prevents hotspots on the forehead, nose, and cheeks. To open shadows on the far side of the face, I use a white foam board just outside the frame to bounce light back gently.
Here’s the foundation setup I use in studio:
Window light coming from the side
Diffusion adjusted based on brightness
Posing surface parallel to the window
White reflector on the opposite side to control shadow depth
Neutral backdrop stretched smooth to keep attention on the baby
This setup creates clean, dimensional light with detail in the skin and softness in the shadows, without needing flash or artificial fill. It keeps the environment quiet and calm, and the images remain natural and timeless straight out of the camera.
The light source must feel large relative to the baby. The closer and broader the source, the smoother the transition between highlight and shadow. This is what gives newborn images that soft, glowing look without losing form or depth.
Technique 2: Working With Soft Natural Light
With a good window setup, you can create multiple looks without changing your light source. The posing surface remains parallel to the window, and small adjustments in the baby’s angle control the mood and depth. Turning the baby slightly toward the window increases softness and highlight. Turning slightly away increases shadow and contour. This is how you maintain control without constantly rearranging equipment.
In studio, blinds stay fully raised so the light is clean and uninterrupted. Sheer fabric is used for diffusion because it provides one continuous gradient across the skin. Slatted blinds or partly closed shutters break the light into bands, which is not flattering for newborn skin.
When working in a client’s home, the best window is the one with the widest view of open sky. It does not need to be decorative. A sliding glass door with sheer curtains often provides better, broader light than a styled bay window with heavy or colored drapes.
For sleepy poses, I angle the baby slightly toward the window so the light moves smoothly from the forehead to the chin. Hands rest close to the cheek, and the swaddle is smoothed to avoid small wrinkles that catch unwanted highlights. If using a bowl or crib, the interior is lined with a soft, matte layer so it reflects light upward rather than absorbing it. A small rotation of the prop toward the window can completely refine the shadow on the cheek or under the brow.
Avoiding Harsh Light And Hotspots
For awake babies, I move the baby slightly farther back from the window to prevent oversized catchlights and keep the eyes looking natural. Newborns will naturally look toward the light on their own, this is the moment to take the image, not to reposition.
If light becomes harsh, it is usually because the source has become too direct or too small. Doubling diffusion or stepping the posing surface back restores softness. Avoid shiny fabrics or reflective props when light is stronger, as they create hotspots on the forehead and nose. Matte backdrops and textured wraps help maintain an even, soft finish across the skin.
For those learning or wanting to learn more, I recommend taking my DIY Newborn Photoshoot Course.
Technique 3: Direction Of Light, Sculpting Tiny Features
The direction of light determines how a newborn’s features appear in the image. Side light creates depth and shape. Light coming from slightly above defines the nose and lips. Light that comes directly from the front flattens texture and reduces shadow, which can work for very minimal, clean portraits.
For a classic newborn portrait, I place the window to the baby’s side and slightly forward of the face. This creates a soft shadow that falls gently toward the corner of the mouth. If the far cheek becomes too dark, I use a white reflector just outside the frame to open the shadow without eliminating it.
How To Shape With Shadows
Shadows are important because they create dimension. When a hand is tucked near the cheek, the shadow under the fingers helps show shape and depth. If the shadow is too deep, the reflector moves closer. If the image looks too flat, I simply move the reflector away. Adjustments are measured in inches, not feet.
Feathering the light is another key technique. Instead of pointing the brightest part of the window or panel directly at the baby, I angle the posing surface so the baby receives the softer edge of the light. This keeps the skin natural and avoids highlight patches on the forehead, nose, or swaddle.
Light falloff helps guide the eye. I position the baby so the face is closest to the window and the feet are slightly farther away. This naturally brightens the face and lets the rest of the body fall gently into darker tones. If the scene becomes too evenly lit, a piece of black foam board on the opposite side can add subtle shadow depth, this is called negative fill and is especially useful for profile or side-lying poses.
In editing, the goal is to support what the light already created. A soft gradient can lower exposure on the lower half of the image to keep focus on the face. A very light dodge can lift the catchlight in the eyes. The image should still look like what was seen in the room.
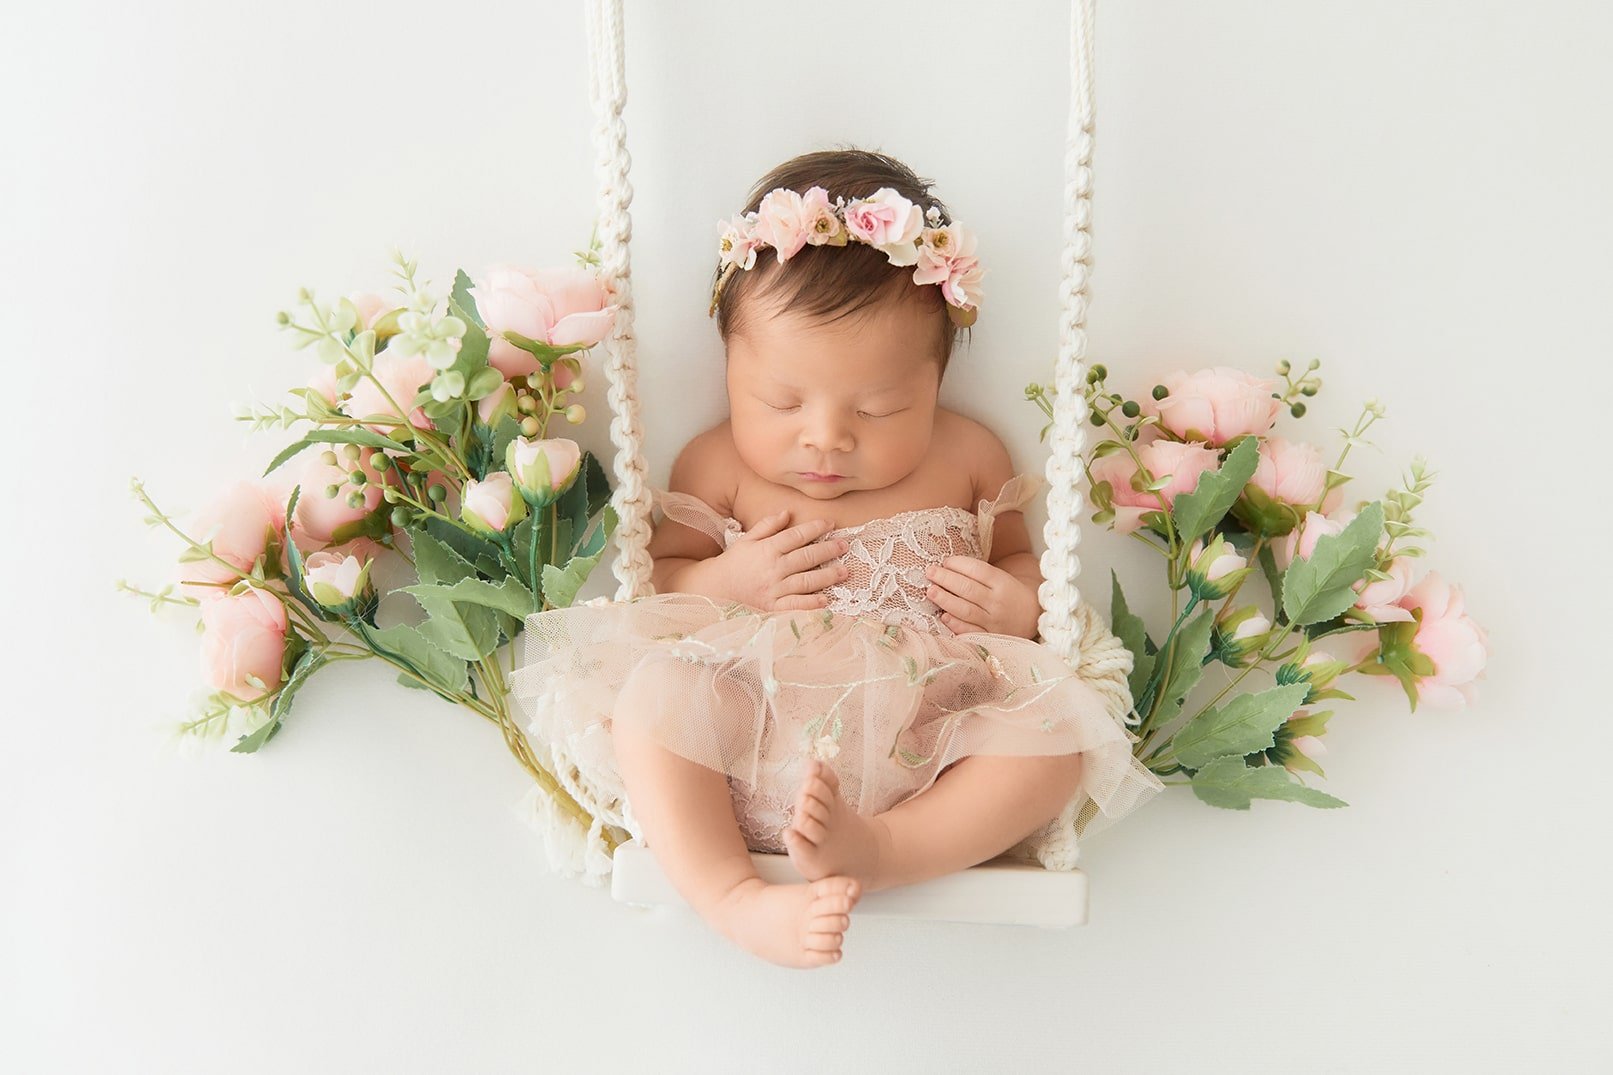
Technique 4: Creating Light Harmony With Props And Textures
Every prop in a newborn session interacts with the light. The material, color, and finish affect how highlights and shadows appear on the baby’s skin. The goal is to choose props and textures that support the lighting.
Neutral backdrops such as cream, warm beige, or pale gray are the most consistent under soft window light and are flattering for every skin tone. They also prevent unwanted color casts. In newborn work, I avoid glossy or reflective fabrics because they create hotspots on the forehead and cheeks. Matte materials, like muslin, ribbed cotton, or wool knits, scatter light evenly and maintain soft transitions.
Props That Reflect, Not Distract
The interior of a prop matters. A raw wood bowl or crib lined with a soft knit reflects a small amount of light upward into the face, which keeps the shadows open and natural. Dark, stained, or shiny surfaces absorb light and can deepen shadows more than desired. If I’m using a darker prop, I add a thin, neutral-colored layer inside to bring light back to the baby’s face.
The angle of the prop relative to the window is just as important as the material. Tilting the head end of a mini bed or bowl slightly closer to the window brings the face into the softest part of the light. A small folded receiving blanket beneath the baby’s shoulders lifts the face toward the light and ensures clean, even illumination without strain or repositioning.
Textures should be simple and quiet. Busy patterns create distracting highlights and shadows. Light knits, ribbed fabrics, fleece, and wool layers all work well because they add depth without competing with the baby’s features.
Technique 5: Lighting For Different Moods
The same lighting setup can create very different moods depending on distance, diffusion, and the tones of the surrounding materials. This is how you create variation in a gallery without changing the pose or the baby’s position.
To create an airy, bright look, I move the baby closer to the window and use additional diffusion to reduce contrast. The reflector stays close to open shadows. The backdrop and props stay light-toned so the wrap of light remains consistent across the scene.
Exposure stays on the brighter side, but highlights are controlled to avoid lost detail.
To create a warmer, more intimate look, the baby moves a small step back from the window, and I introduce a slight amount of negative fill (a piece of black foam board) on the opposite side. This increases shadow depth gradually without creating harsh contrast. Backdrops shift to warm neutrals, and wooden or woven props help absorb some light to create a grounded, cozy feel.
Matching lighting to the baby’s state helps keep the session smooth. A baby who is more alert often settles faster in a slightly darker, more cradle-like setup. A deeply sleepy baby can be photographed closer to the window for a cleaner, brighter look.

Technique 6: Managing Artificial Light for Newborn Photos
When natural light is weak or inconsistent, artificial light can extend the setup without changing the overall look. The goal is to use artificial light as a continuation of the window, not as a second, competing source.
A large continuous LED panel with strong diffusion works best. I place it on the same side and in the same direction as the window light. The panel remains behind the diffusion fabric so the baby never sees a direct light source. This maintains the same soft, wraparound quality as window lighting.
If there is no usable natural light at all, the LED panel becomes the primary light, but the approach stays the same: large source, close distance, heavy diffusion, reflector on the far side. A white wall can act as a reflector if needed.
For backlit halo effects on overcast days, I place a small diffused LED behind the posing setup and bounce it into a white wall instead of pointing it directly at the baby. Bounced light prevents hotspots and keeps the background glow soft and controlled.
Safety always comes first. Artificial lights should never produce heat near the baby. Stands are weighted, cords are secured, and the light moves to the baby, not the baby to the light.
Technique 7: Capturing Movement And Awake Moments
Every parent secretly hopes for one wide-eyed portrait, even if the plan is a sleepy gallery. Awake moments are where light and patience meet personality. An awake baby reflects light like a mirror, so the setup favors bigger sources farther back and softer falloff. keep the light large, soft, and slightly farther back to reduce specular reflections in the eyes and on the forehead. Maintain the same light direction you use for sleepy sets so the gallery stays consistent if the baby drifts back to sleep.
Place a white board close to camera-side to increase the apparent size of the source and refine catchlights without flattening shadows. Raise shutter speed modestly to hold small gestures, typically 1/250–1/400 sec depending on focal length and movement, while keeping ISO and aperture in a range that preserves clean skin detail. A gently swaddled baby angled a few degrees toward the window will naturally turn to the light, take the frame as the eyes settle rather than re-posing repeatedly. If using a crib or bowl, elevate the head safely so the face sits in the softest part of the spread and angle the set so the rim never casts across the brow.
When hands are active, keep the wrap snug through the torso and expose a single hand near the cheek, the controlled shadow under the fingers adds depth without distraction. If the room is very bright and eyes look glassy, increase diffusion or pull the baby a small step back from the window so the catchlight reduces from an oversized rectangle to a softer shape. If adding LED fill, place it on the window side, behind the diffusion layer, so it behaves like the same source and does not create a second, sharp catchlight.

Technique 8: Backlight And Rim Glow
Backlight is the soft crown that makes newborn photos feel angelic without ever tipping into harsh light. Set the posing surface a few feet in front of a diffused window so the crown of the head faces the brightest area and the nose turns slightly back toward camera. Double the diffusion (sheer plus muslin) to turn the window into a cloud, keep all shiny props out of the halo zone, and choose matte textures, ribbed swaddles, brushed knits, unfinished wood, so the rim glow outlines baby fuzz, bonnets, and headbands instead of bouncing glare.
If the day is gloomy, slip a large continuous LED behind the same diffusion and bounce it into a white wall, size and distance matter more than power, and the baby should never feel heat or see a pinpoint source. A lens hood (or a shaded hand just off-frame) preserves contrast, and a whisper of intentional haze can be added by letting the very edge of the diffusion skim the frame until the glow kisses corners without washing the face.
Balance the halo with the gentlest front fill so skin stays luminous. A white foam board low and camera-side lifts cheeks by about half a stop while keeping catchlights high and soft and add a second board at shoulder height if the far cheek sinks, or a sliver of negative fill for profile depth.
Expose for the face, not the glow, allow the hairline highlights to sit near the top without clipping, and warm white balance slightly if cool walls sneak blue into the rim. In post, a feathered linear gradient can nudge foreground exposure down a fraction to guide the eye, and a tiny curve lift on the halo preserves that airy outline. Used with side-lying wraps, potato poses, and mini crib setups, this technique creates a consistent, believable halo that parents love.
Editing Light
Editing should reinforce what the setup created. Start each session with a custom white balance frame by the window to keep skin tones consistent. Build a base profile that protects highlights and avoids crushed blacks so newborn skin stays breathable.
Set exposure so skin reads natural, lower highlights slightly if the forehead blooms, raise whites minimally for a clean overall feel, and keep blacks just above true black. Avoid clarity near faces, reserve texture and micro-contrast for knits, wraps, and wood where detail belongs. Use a soft radial or linear mask to nudge exposure around the face by a fraction, echoing the real falloff.
Correct local color casts from nearby walls or clothing with restrained HSL or local desaturation rather than global shifts. In Photoshop, retouch with low-flow healing and conservative frequency separation only when necessary, preserve pores, peach fuzz, and natural transitions.
Putting It All Together In A Real Session
A real morning at my Beverly Hills studio begins with warmth and quiet. The posing surface is parallel to the main window. The diffuser hangs like a cloud. A pale knit backdrop is stretched smooth. A shallow wood bowl waits nearby, lined with fleece. Camera batteries are full.
A 35mm sits ready for wider storytelling frames, and an 85mm is standing by for portraits. The newborn arrives, baby is warm and swaddled, and parents settle on the sofa with tea.
The first set is classic side light. The baby lies on the posing surface angled toward the window, hands tucked near the cheek, nose line clear. The light falls in a silk ribbon across the face, and the reflector opens the far cheek just enough to keep both eyes luminous if they flutter open. The second set moves to the bowl. The bowl is tilted toward the window so the rim never shadows the eye, and the knit liner lifts under the shoulders to raise the face into the brightest part of the glow. A bonnet is added for variety, and its matte knit keeps the forehead looking like velvet.
If clouds roll in, a large LED slips behind the curtain on the window side to maintain softness without changing direction or quality. During an awake window, the baby moves a step back from the glass, diffusion stays doubled, shutter speed rises, and the white board remains close to camera to manage catchlights. The edit balances the session so bright, airy frames and warmer, grounded frames share the same skin tone and contrast curve. The result reads as one consistent morning with controlled variation, not multiple unrelated setups.

Newborn Photography Lighting For Special Scenarios
Every newborn session brings surprises, and light is the comforting constant. Twins are arranged so their heads find the window side equally, with one baby slightly in front so the light shapes both faces gently. Babies with more textured, peeling skin adore diffused, feathered window light because it minimizes sheen. Babies with beautiful deeper skin tones glow against neutral backdrops when the reflector is pulled in closer and white balance tilts a hint warmer to keep richness.
In small apartments during an in-home photo session, a sliding door becomes the studio. Turn off overhead fixtures that mix color temperatures, and embrace the single soft direction. Place baby at the door’s edge where the light is largest. A simple white bedsheet taped to the wall opposite acts like a giant reflector. Good light is possible almost anywhere when you chase size and softness, not gadgets.
For families wanting to learn how to take newborn photos safely at home, the DIY Newborn Photoshoot Course is a must-watch. It covers how to set up by a window, how to keep baby safe and comfortable, and how to create beautiful photos with minimal equipment and maximal love.
For photographers building a full newborn photography studio workflow, the Full Newborn Shoot Day Course and the Newborn Photography Course dive into everything from set building to posing safety so every newborn session feels like second nature.
Posing With Light As Your Guide
Poses require light that supports them. Tucked side-lying poses adore side light because it traces the curve of the cheek. Froggy and chin-on-hands looks, when performed safely by trained professionals, prefer a slightly higher light angle so the nose shadow stays neat and the lips glow. Wrapped potato poses are happiest with feathered light so the top of the wrap never becomes a shiny band.
Every adjustment is small. Rotate the baby five degrees toward the window and watch how the shadow under the nose perfects itself. Lift the reflector an inch and see the far eye wake up. Slide the posing surface closer to the window and see the bonnet knit soften. This is the dance. It’s never rushed. Baby’s comfort leads, the light follows.
Conclusion
Newborn photography is my favorite type of portraiture. Those first few weeks are such a blur of feeding, naps, and wonder, you will always be happy to have captured them with beautiful photos. Lighting helps that happen. Once you master it, the technical parts become simple, chase size over power, choose matte over glossy, place the baby where the light already loves them, and finish with edits that respect what the room gave.
Families will cherish these photos ten and twenty years from now because they feel true. They remember the heartbeat of a morning, the way a wrap looked like a hug, the way light brushed a tiny face and said, this is the beginning of everything.
For those ready to go even deeper, Roxamina Photography Academy offers complete courses designed to turn knowledge into muscle memory. The Full Newborn Shoot Day Course shows a real session from first curtain pull to final export. The Master Newborn Photography Masterclass teach everything you need to know to make every gallery consistent and stunning.
The DIY Newborn Photoshoot Course helps parents and new photographers take beautiful photos at home with safe, simple setups. The Sitter Session (6 Months) Course and Cake Smash for Girls Course continue the story through the first year.

About Ramina Magid
Ramina Magid is an award-winning newborn photographer, celebrated for her organic, timeless approach to capturing life’s earliest moments. Originally from Baku, Azerbaijan, Ramina built her dream newborn photography studio in Beverly Hills, where she has photographed more than 800 newborns and families over the past eight years.
Her gentle, safety-focused style and natural light aesthetic have made her one of the most sought-after newborn photographers in California. In 2024, her work was recognized with awards for Best Newborn Photographer in both Beverly Hills and Los Angeles. Ramina’s portraits have reached millions worldwide through social media, admired for their warmth, simplicity, and emotional honesty. See her courses here.

Source: Ramina Magid